- Feb 11
How to Add a Google Calendar to Your Podia Site
If you run workshops, classes, or live sessions, having a simple calendar page on your website can simplify your workflow and improve your audience experience. Instead of listing dates in long blocks of text, a calendar lets visitors quickly see what’s coming up, click into specific events, and register with ease.
The good news is that you don’t need a complicated booking system or expensive tools to make this happen. With a free Google Calendar and a few clicks inside Podia, you can create a clean, easy-to-update calendar page that stays in sync with your events.
In this tutorial, I’ll walk you through exactly how to set up your calendar, customize your events, and embed it on a new or existing page on your Podia site—so you can manage everything in one place and keep your audience informed. It'll end up looking like this:
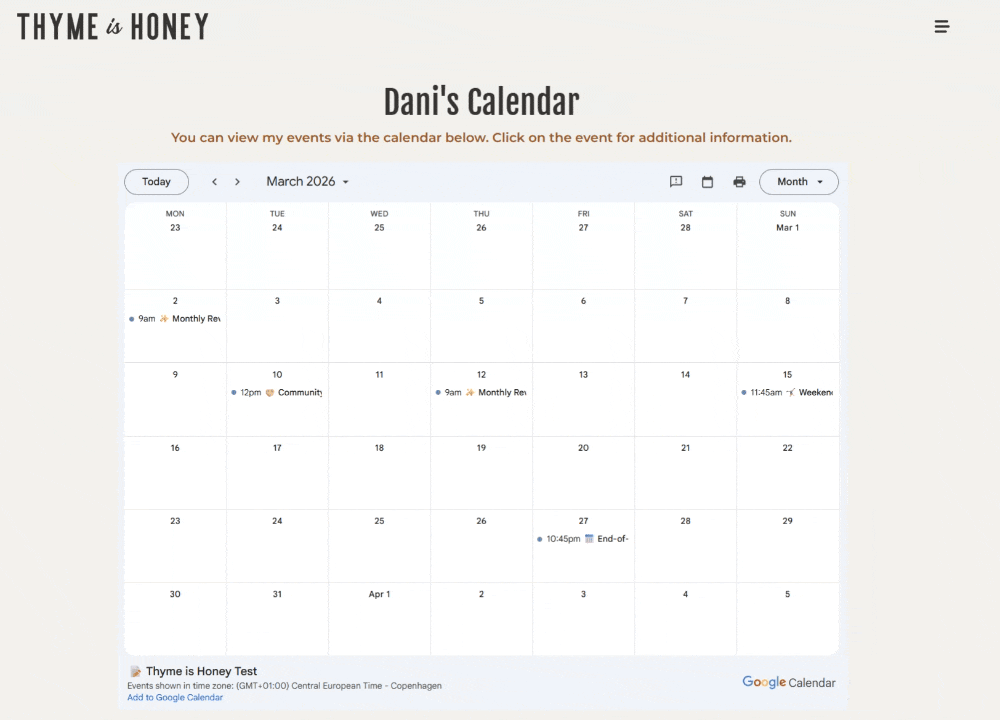
They can see all of your upcoming events, scroll month to month, and if they click on an event they can see more information -- such as the location (with link to Google Maps), video conferencing info, date, time, link to RSVP, buy a ticket, etc.
Are you running your business on Podia (hope so!) and interested in creating a similar page? Here is a step-by-step video tutorial for you, with detailed directions available below it:
From Your Google Account
Create the Calendar:
While logged into the Google Account where you want the calendar to exist, go to Calendar.Google.com.
Click the "+" to the right of where it says "Other Calendars" and select "Create New Calendar".
Give the calendar a name, and click "Create Calendar".
Customize the Events:
If you're ready, you can now add events to the calendar -- or you can come back to this later. I recommend adding at least one event so you can test how it looks and functions.
Add an event by clicking on a date on the calendar, adding the title (I recommend including an emoji!), start/end times.
If the event has a physical location you can add the address or tag it on Google Maps by clicking the "Add Location" option.
If it needs a virtual meeting room click "Add Google Meet Video Conferencing".
You can click "More options" at the bottom to edit the event description. This is where you could add more details, a link to the registration page, etc.
Tip: Once an event is set up and added to your calendar, you can click the three dots "..." in the top right of the event and choose "duplicate event" then add it to a new date so that you don't have to set the entire event up every time.
Adjust Settings + get link:
From your list of calendars along the left side of the screen, hover over your new calendar, click the three dots "..." and choose "Calendar Settings".
Under "Access Permissions for Events", check "Make Public" and adjust the drop-down to "See all event details".
Under "Integrate Calendar" copy the URL in the section titled "Public URL for this Calendar".
From Your Podia Account
Add New Page:
Log into your Podia dashboard and click on "website" from the menu on the left.
Click the "New Page" button at the top right of the screen. A new page will load.
Adjust Slug:
Click where it says "new page" in the top left of your screen.
From the list of website pages, locate "new page" and click on the gear icon that appears to the right.
You can now give your new page a name, and edit the URL. For example - I have named the page "Calendar" and have updated the URL to "calendar" (whatever you put in the URL space will be YourPodiaSite.com/calendar).
Add Text Area:
When you create a new Podia page, it usually plugs in a canvas with a photo on the left and text on the right by default. We're going to add a different one.
Hover over that existing layout until a "+" sign appears at either the top or bottom and click on it.
From the menu on the left, select "Text" from the "Insert Section" options.
Select the top option, which has a single column of text that is centered.
Once this section is added, you can customize or delete the Pretitle, Title, and Subtitle as needed.
When you're done, click back on that first section (with the image placeholder) and then click the trash icon to delete it.
Embed Calendar:
To embed the calendar, you will click in the "text" area that is below the "title" area for that page.
You'll then click the / button on your keyboard, and should then see a menu of options.
Choose "embed".
This is where you'll paste that URL you copied from your Google Calendar.
Publish + Test:
As soon as you paste the link into the embed tool, it should populate your Google Calendar in that text area like a small preview, but it will NOT display it on the website within the Podia Editor.
To see how the calendar displays, you'll need to click "Publish" in the top right, then go to the URL that you set up (YourPodiaSite.com/calendar, for example) to see how it looks.
Things to know:
The calendar will sync whenever the page is loaded or refreshed, so new events added to your calendar will show up instantly (more or less).
If you need to make changes to an event (adjust the time, update the address, etc.) you'll just make those changes to the event in your Google Calendar, and the changes will be reflected on your website.
Additional tutorials that might be helpful:
Tips for Customizing Your Google Calendar and Events
How to use Emojis on a Computer
Want to talk with me about your Podia Website? I offer packages for full site design, single-page design, website audits and hourly packages (5, 10, 20 and 40 hour increments) that can help support you in building, launching, or optimizing your Podia Site. Schedule a free 20-minute call here.
That's it! You can of course adjust the colors, size, or width of the calendar under the "design" tab. You can also add additional sections to the page if you have other information to showcase. Do you have questions or hung up on any steps? Just pop them in the comments or reach out to me - Dani@Thyme-is-Honey.com
📌 Pin this post by clicking the image below:
Well, hello there..
I'M DANI...
Systems + Efficiency Expert and Digital Organization Nerd
I help busy people just like you reclaim their time and optimize their online presence with virtual support and intentional strategy.
I'm a Verified Podia Pro, Flodesk Partner, and author of a Substack Best Seller. I would love to hear about what you're working on...
I also write on Substack!
Join 15K+ productivity nerds and follow me over there ✍🏻